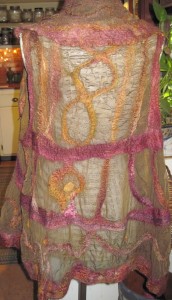
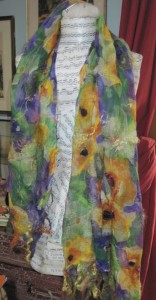
Someone asked me the other day what the word Nuno meant, and I had to admit that I didn’t really know. I first heard the term when I took a class from Carin Engen and just took it at face value. But, being the modern girl that I am …………….. I Googled it. So, I can tell you that the word means cloth in Japanese.
The technique was developed by Polly Sterling in 1994. Polly had moved from Yorkshire, England to New South Wales, Australia. She no longer needed the heavy woolen clothes necessary in a snowy landscape so she set out to create something new. Isn’t that always it… necessity being the mother of invention. Anyway, she developed a technique of applying small amounts of wool to fabric which she called Nuno felting. Polly is a professional textile dsigner known for her contemporary approach to hand made felt. Using a minimun amount of wool felted through a fine base weave, she makes a felted fabric quite different than traditional felt.
Nuno Felting can be done with any fiber that felts: merino, alpaca, angora, mohair, etc. with varying results. Some wools felt easier than others. I have found that I like an 80/20 merino/silk blend.
The cloth that you use as a base is also important. A loose weave fiber such as silk chiffon is the easiest, but I have Nuno felted on netting and cheese cloth as well. Experimentation is the best way to learn this method as everyone brings their own ideas to the art and new ways are developed by just ” playing around” with the materials.
I like a fabric that drapes nicely and I try to put just the tiniest bits of wool on at a time. When I first started, the “tiny” bits of mine turned out to be way too heavy when the scarf was finished. Mere wisps of fiber felt up to be more substantial than one might think.
When I begin to make a scarf, I start with a larger piece of chiffon than I want the finished piece to be. Of course the amount of felting you do will shrink up the fabric and this will affect your final outcome. A lot of wool used over the surface of the fabric asks for a larger piece and the use of very little wool means you need a smaller piece of fabric. I have discovered over time that I like a more narrow, but longer, fabric. That way it doesn’t bunch up around the neck and it drapes nicely.
I am really a novice when it comes to Nuno felting. I was intrigued, I tried it,and I’ve enjoyed making scarves and wraps and sharing what I have learned. Each person who works with the process will bring new ideas and develop new techniques. I think that is what is most exciting to me, trying something new and bringing my own artistic ideas to fruition. I encourage you to jump right in, try something new and see what comes…you might be surprised!
Supplies needed
Bubble wrap …… as wide and a little longer than your fabric. Duck tape short pieces together.
silk chiffon or? 20″ X 65″ ends up 14″ X 60″
Bar of olive oil soap
Dawn detergent original
bowl of water
plastic grocery bag for wetting and two 13 gal. garbage bags for the felting
nylon curtain material ( remember the curtains from the 50’s?)
wool, curls, yarn etc for the felting
string or ties to tie up the bundle
a length of 2 inch pvc pipe
To Begin…………… Think through a design… or just go for it. A lot will depend on your fabric.
Does it have a design? Is it a solid color? Do you want contrasting colors? Do you want a controlled end result or a wild, fringy result?
Lay the bubble wrap on the table bubble side up. Put the fabric on top and begin putting wisps of wool on the fabric. Think smoke. Depending on your design it may take you quite some time to lay out all the wool. I always take a long time and, although I choose a color theme, I tend to plan as I go.
If you want to add things besides wool, you may need to anchor them down using tiny wisps of wool on top. Curls, silk, yarn and metallic threads may need to be held in place.
Once the design is to your liking it is time to put the nylon curtain material over the whole thing.
Now take the plastic grocery bag and wad it up. Fill a bowl with water….. temperature is not important, except for your comfort. Put a DROP of Dawn detergent into the water.
Now wet the bag and use it to wet the scarf. Dip and pat. No rubbing at this point. When the entire scarf is wet (not sopping, just wet)
take the bar of soap and gently rub it over the surface of the scarf. It is important not to use too much soap……. just enough to let you hard slide across the top. No suds.
When you have rubbed the entire surface and are pretty sure that all the wool is wet, it is time to roll the bubble wrap up around the pvc pipe and tie tightly. I use t shirt strips for ties, usually 4 of them.
Now that your scarf is safely rolled around the pipe and tied, it is time to roll. This process is a lot of work and not for the faint of heart… or anyone with back problems. The task is to roll the pipe 400 times. Not a typo ……..400 times.
After each 100 rolls open the bundle and pull up the nylon very carefully so as not to lose you design. You need to make sure that the wool is not penetrating the nylon.
Each time you open the bundle roll it up again from the opposite end to allow it to felt evenly. I have taken breaks and gone away and come back later to roll some more. It can be very physical.
After the last roll, open the bundle and pull off the nylon. There may be some areas that have not felted fully. If they are not too bad you can simply rub the area with the bar soap and felt with your hand.
If you have a lot of unfelted areas, you may need to roll some more. Cover the scarf with the nylon again, rub with soap and roll away.
The biggest mistakes are using too much soap or too much water. I do this on my kitchen table and have no runoff.
Once the wool seems to have felted, it is time to rinse the scarf in hot water, squeeze it out and put it into the garbage bag. Now it is time to throw the bag on the table and/or on the floor. Throw it hard. This is the fulling process and really shrinks the wool. It will begin to pucker the fabric and shrink it up nicely.
Throw it for several minutes and then take it out and look at it. Change it around so a different part is hitting the floor and throw it some more. Some people like to put the scarf in the dryer at this point. I prefer to throw it more, rinse and let it air dry.
Click here for the next article

