THE LOOMS
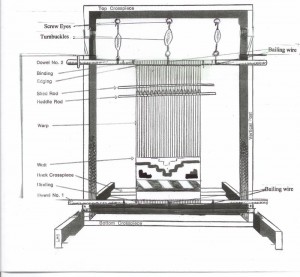
The traditional Navajo loom is a free-standing, upright loom and, rudimentary as it is, it is very well suited to its many needs. As you can

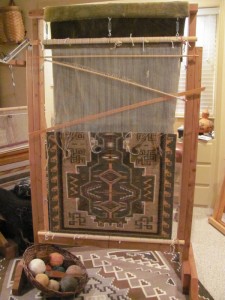
The Navajo floor loom
see from the pictures, the construction is a simple four-sided frame and the sheds are operated manually using a shed stick for the “stick” or “easy” shed and a heddle rod for the “pull” shed. If the weaving is to be a twill, or a two-face weaving, there may be one stick shed and several pull sheds. The traditional loom sits on the floor and the weaver begins the weaving sitting on the floor as well. As the weaving progresses up the warp, the weaver also sits higher by using pillows, progressing perhaps to a stool, then chair, barstool, etc. You are growing with your weaving. I have seen pictures of Navajo women with their chairs up on top of a table in front of their looms so that they can reach. The looms we use are very traditional with the only modification being the more modern method of using turnbuckles to tension the warp instead of the original use of rope for tensioning. When we began weaving, we also used rope. Many of the Navajo are now using turnbuckles as well and the ability to achieve a much more even tension is the result. But out on the Reservation, i.e. in Canyon de Chelley, you will still see the elderly grandmother sitting at her loom, lashed to a beam on the ground and tensioned by using rope on two upper beams which may be lashed to a tree limb above.
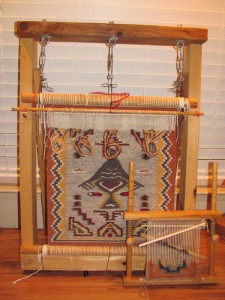
As our own weaving has evolved, we have developed several variations of the traditional loom. We build the looms for ourselves, for our workshops and on special order for those who want to advance to something larger. There are mini-looms that can sit on your lap and lean against a table. There are mid-sized looms that have an easel arm in the back and sit on a table. Larger looms can either sit stationary on the floor or be fitted with side supports that allow the loom to move up or down inside those legs so that the weaver can, from the beginning, sit comfortably in a chair and not have to deal with the floor “comfort.” We also have a very large loom that we have built that will accommodate a weaving of up to approximately 5′ x 8′. This is a traditional “up and over” loom design which allows the weaver to weave a much longer rug by rolling the weaving down and under around large poles or pipe as the project progresses. Given any of these variations and modifications, all of our weaving techniques adhere specifically to the Navajo tradition.The Navajo loom’s design is very conducive to a nomadic lifestyle. The project can be disassembled and rolled up for travel and then reattached for weaving later on. The loom can be disassembled as well and bundled into a smaller mass. It is possible to have a warping board incorporated into the back of the loom frame making a two-in-one piece of equipment. So, it can be said that a traditional Navajo loom was designed specifically for this type of weaving as well as for the lifestyle that the Native Americans led in the early history of Navajo tapestries.

A Navajo Floor loom
A Navajo weaving is a four-selvage weaving and there is no fringe on the finished product or extra warp extending beyond the project needing to be tied or knotted. The piece may be
warped up on a separate warping board, however many times it is accomplished on the back of

mini and table sized Navajo looms
the loom frame itself. There are no pegs or other warping aids to determine the epi on a truly traditional loom so weavers are free to set the spacing as they desire to match a weft weight with no limitations. Often there is the addition of a “side edging cord” which adds stability to the side selvages of a rug, especially if it is to be used on the floor or
as a saddle blanket. The Navajo loom design makes it possible to incorporate this cord on each side as the weaving progresses.
- Setting up a Navajo loom is not an easy chore. It takes some time and effort. First the warp is wound in a figure eight around two poles attached to a warping frame and spread apart the basic length of the rug to be. Next the edging cord is twined on each end of the rug, spacing the warp and creating the end selvages. Then the twined ends are bound with heavy, cotton twine, onto the poles that will be wired to the loom frame. When the warped piece is attached to the loom, further, more accurate, spacing of the warp may be necessary. It is this “fine-tuning” of the warp that will produce a rewarding weaving experience for the weaver and an even, flat and straight rug. If side-edging cord is to be used, it is attached to the bottom pole so to be held in place and incorporated with the outside warps as the weaving progresses.

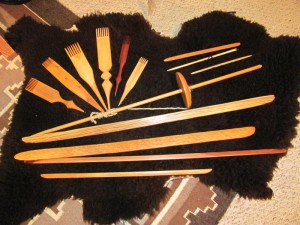
A selection of tools used in Navajo weaving-note the Navajo spindle in the center
The tools used in Navajo weaving are very simple, rudimentary tools that can be designed and made by the weaver for specific purposes or as the need arises. Many elder weavers passed their tools down to the younger generation as a way of maintaining tradition with the thought in mind that the well-used tools contributed to the spirit of the weaving. Basically those tools include a batten, a fork (or beater) and perhaps a few short sticks used to push the weft through the warp or refined to simulate needles for use when the finishing area gets very tight. Of course, today, the use of metal needles is very common for this process.
Click here for the next article